Blinky Project with STM32F401 Nucleo
May 01, 2021

Getting started with Weld and STM32F401-Nucleo
The project repository for this article is available on github.
In this article, we will go over the basics of setting up a project with Weld and create a sample project that blinks an LED on a STM32F401 Nucleo board. Due to their rich documentation and great example projects, we will be using the ST micro-controller ecosystem throughout this blog. You can find out more about the ST offerings on their website..
Getting Started
Before getting started, make sure you have the latest versions of STM32CubeIDE and STM32CubeMX installed on your computer. The CubeIDE is not a must have but you are going to have a tough time getting started without it. The CubeMX is a initialization code generator for ST micro-controller products and it will allow you to graphically enable and customize peripherals and middleware and then generate a highly commented initialization code that you can use to build your application on top of. The CubeMX alone is one of the main reasons that we decided using STM’s ecosystem for this tutorial.
Also, for this project we use the STM32F401-Nucleo development board. If you have any other ST development board, that is fine as well, and you can follow this tutorial and change things around based on your dev board.
Setting up the initialization code
In order to generate the initialization code, open the STM32CubeMX application and in the selector tool, type STM32F401 (or your specific part number) in the part number area and then select the Nucleo board from the MCU list and hit “Start Project” This will open up a window that has all the board specific peripherals pre-configured and ready to go.
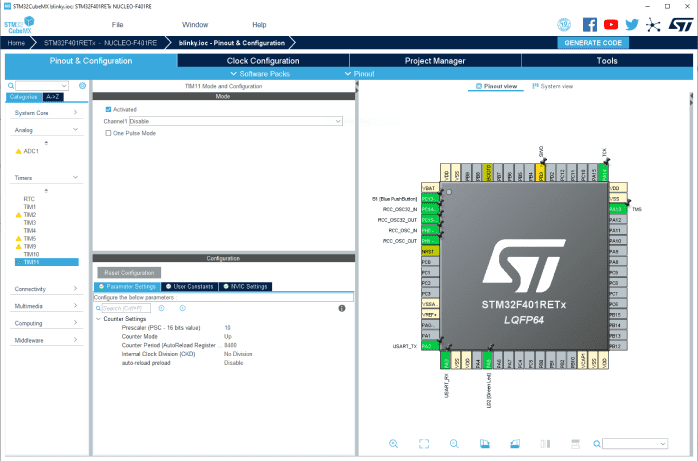
In order for us to be able to blink the LED in specific intervals, we need to execute the Weld generated code inside a Timer IRQ Handler function. So, we are going to enable the TIM11 peripheral and set the Prescaler and Period so that we get a 1kHz timer. Also, we need to enable the TIM11 interrupts in the NVIC Settings tab, as it is shown below.

Now, navigate to the Project Manager tab on top of the page, select the project name and directory, your desired toolchain (STM32CubeIDE in our case) and also the Application structure, which we set to basic here as it is easier to navigate! We now have everything ready for initialization code generation, so, we can hit that “Generate Code” button on the top right corner.
Once the code is generated you can open the project in the CubeIDE and start developing your application.
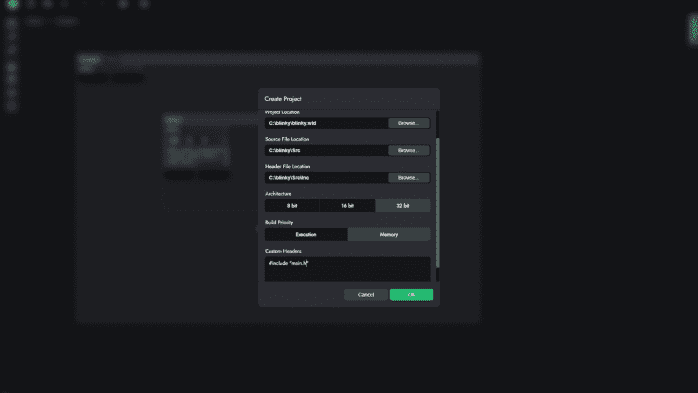
Make sure you include “main.h” and any other headers that you use in the “Custom Headers” section of the project settings.
The most important setting here is the “Custom Headers” settings. Everything that is added in this text box will be placed on top of the generated C files, you you would want to include all the header files that you are going to use inside the Weld application in this box. For this project, the “main.h” is what we are going to be using, so we add #include “main.h” in this box. Now, the project setup page should look like this:

Designing the State-Machine
Once the Weld project is created, You will be redirected to the main page of the application where you can drag and drop as many threads as your application needs. For the blinky project, we only need one thread so we will be using the default thread that is already created for the project. Before starting to develop the state machine, we should customize the thread parameters by selecting the thread (clicking on title bar) and navigating to the “Properties” tab on the right side of the screen. In the properties tab:
- Type a name for the thread
- Choose “Serial” for the type since we want to have only one active state in the thread
- type in “1000” Hz for the execution frequency.

This is the blinky.c source file that is created by the application. it includes a wF_init(void) function which contains the initialization code necessary for the state machine and should be executed once before the state machine functions are executed.
| Cities | Features | Features 2 | Features 3 | |
|---|---|---|---|---|
| 1 | Port Faustion | Port Faustion | Port Faustion | Port Faustion |
| 2 | Noelchester | Noelchester | Noelchester | Noelchester |
| 3 | ||||
| 4 |
Similar Posts
Explored enough to launch your own spaceship?
Get Weld!
Weld is completely free! You can use it on every desktop platform.
Weld.Dev
127 Main St, Charlestown
MA 02129, USA
2021 © All Rights Reserved
